Baja Tips and Tricks (STAY ON TOPIC!)
Moderator: bajabob
Baja Tips and Tricks (STAY ON TOPIC!)
As requested, this is a sticky "Baja Tips Only" thread. All other posts or replies that aren't tips will be removed. Thank Atomic Baja for the birth of this thread.
-
holland_patrick
- Scoobytruck Contributer
- Posts: 83
- Joined: Mon Feb 21, 2005 8:20 am
- Location: CT
-
holland_patrick
- Scoobytruck Contributer
- Posts: 83
- Joined: Mon Feb 21, 2005 8:20 am
- Location: CT
I made a photo tutorial for changing the oil in the Baja - I have heard a few people ask questions in the past - so I decided to document my last change.
Here is the link
http://picasaweb.google.com/jonathan.ma ... kOilChange
I will be adding one for installing a Cold Air Intake on a 2003 Baja NA
Hope this helps those of us that normally don't change our own oil.
Jonathan
PS As always, comments are welcome
Here is the link
http://picasaweb.google.com/jonathan.ma ... kOilChange
I will be adding one for installing a Cold Air Intake on a 2003 Baja NA
Hope this helps those of us that normally don't change our own oil.
Jonathan
PS As always, comments are welcome
Re: Baja Tips and Tricks (STAY ON TOPIC!)
Nice write-up on changing the oil. I need instruction on changing the manual trans fluid or the gear fluid. I've change other regular fwd manual gear oil but how different is this AWD to the other standard FWD. Please post or direct me to the site if you know one. Thanks.
Re: Baja Tips and Tricks (STAY ON TOPIC!)
Sport Activity Lights not working and found a relay in the spot the instructions give you? Here's what to do:
Problem : You got a nice sport activity light kit and you go to install the relay under the dash and you can't find a plug and there's already a relay in it's place.
Solution : It ends up that a lot of the kits were built for earlier model Bajas and they changed some stuff about the relays. If you already have a relay with a green plug in the place it tells you to put the new one, that's the Fuel Pump Relay, not the light relay. You have to go to a Subaru Dealer and get a new relay from the parts department. Mine costed $13.00 but I've read from others any where from $10 to about $40.
The relay's part number you need is 82501AE03A
Here's what it looks like:

You have to plug it into the empty spot under the fuse panel behind the crap catcher under the steering wheel, as shown by the red arrow (I removed the lower dash panel so you can see it better):
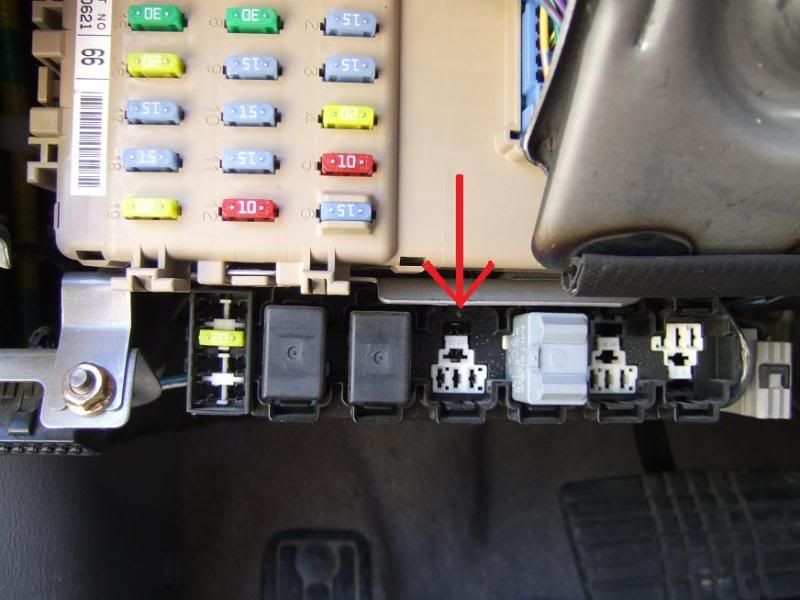
At first glance it looks like the relay will not fit but it does!
Just pop it in and you're good to go. I was able to put mine in by removing the crap catcher and plugging it in from the underside, but it is definitely easier to get to with the entire lower dash panel removed.
The relay they supplied to you can still be used though! It is the same relay as the Fuel Pump Relay that has the green plug so keep the extra one in case your fuel pump realy goes out.
Problem : You got a nice sport activity light kit and you go to install the relay under the dash and you can't find a plug and there's already a relay in it's place.
Solution : It ends up that a lot of the kits were built for earlier model Bajas and they changed some stuff about the relays. If you already have a relay with a green plug in the place it tells you to put the new one, that's the Fuel Pump Relay, not the light relay. You have to go to a Subaru Dealer and get a new relay from the parts department. Mine costed $13.00 but I've read from others any where from $10 to about $40.
The relay's part number you need is 82501AE03A
Here's what it looks like:
You have to plug it into the empty spot under the fuse panel behind the crap catcher under the steering wheel, as shown by the red arrow (I removed the lower dash panel so you can see it better):
At first glance it looks like the relay will not fit but it does!
Just pop it in and you're good to go. I was able to put mine in by removing the crap catcher and plugging it in from the underside, but it is definitely easier to get to with the entire lower dash panel removed.
The relay they supplied to you can still be used though! It is the same relay as the Fuel Pump Relay that has the green plug so keep the extra one in case your fuel pump realy goes out.
FREE Cupholder restoration kit
http://scoobytruck.com/bb/viewtopic.php ... 8057#p8057
My Baja Mods
http://scoobytruck.com/bb/viewtopic.php?f=2&t=1227
http://www.youtube.com/user/thacrudd
http://scoobytruck.com/bb/viewtopic.php ... 8057#p8057
My Baja Mods
http://scoobytruck.com/bb/viewtopic.php?f=2&t=1227
http://www.youtube.com/user/thacrudd
-
Ru Ru McGoo
- Scoobytruck Lurker
- Posts: 5
- Joined: Sun Aug 18, 2013 2:32 pm
Re: Baja Tips and Tricks (STAY ON TOPIC!)
changing manual tranny fluid is very similar to changing front or rear differential fluid. most manuals have a drain plug and a fill plug located together on the same side. They will either be a plug that you stick a 3/8 drive rachet in as the tool to lossen or tighten (remember lefty loosey righty tighty) a plug that you use an allen wrench to take out or a plug that usually takes a 1/2 wrench to remove. Remove bottom plug and drain. be sure to clean the bottom plug well. It will have magnet on it to collect any metal debris that might accumulate due to wear'n tear. Let it drain completely. Replace bottom plug and torque properly. Remove top plug and fill(will OEM recomended gear oil) until it is draining out the hole. ( I recommend to go and buy a small hand pump that is sold at Wally World in the boat section for outboard motor foot oil replacement. It will screw directly on to the gear oil bottle and you can pump the oil into the gearbox.)Let it drain until it stops dripping, just incase you over fill it. Then reinstall the plug and torque properly. !Note The front diff on a Baja takes different oil than the automatic tranny does. I could recommend what oil, but everyone likes different brands. But just make sure it meets OEM requirements. Hope this helps someone... 

Re: Baja Tips and Tricks (STAY ON TOPIC!)
if you decide to change the cabin air filter, there are some good Youtube videos on the subject. However there is one caveat that I would add.
Remove the little plastic retaining clip/screw thingie from the center kick panel FIRST. Because once you release the glovebox (the first step in the video) it will be hanging down and in your way so you'll be popping it back into place just to get some room to work if you did it later like the videos suggest.
Remove the little plastic retaining clip/screw thingie from the center kick panel FIRST. Because once you release the glovebox (the first step in the video) it will be hanging down and in your way so you'll be popping it back into place just to get some room to work if you did it later like the videos suggest.
Re: Baja Tips and Tricks (STAY ON TOPIC!)
Is there any aftermarket brand of cabin air filter that is washable and reusable?Zombaja wrote:if you decide to change the cabin air filter, there are some good Youtube videos on the subject. However there is one caveat that I would add.
Remove the little plastic retaining clip/screw thingie from the center kick panel FIRST. Because once you release the glovebox (the first step in the video) it will be hanging down and in your way so you'll be popping it back into place just to get some room to work if you did it later like the videos suggest.
-
anarchy1024
- Scoobytruck Master
- Posts: 413
- Joined: Mon Apr 12, 2010 4:07 pm
- Location: Toronto, ON
Re: Baja Tips and Tricks (STAY ON TOPIC!)
If anyone's looking for stainless steel brake lines, the Technafit SUB-1120 (http://www.technafitstore.com/SUBARU-BR ... b-1120.htm) kit fits the 2003 Baja.
I found a surprising lack of information on the net about exactly which kit to buy... many people said they did the swap, but nobody said which kit they used. Anyway, this one seems to fit perfectly.
I found a surprising lack of information on the net about exactly which kit to buy... many people said they did the swap, but nobody said which kit they used. Anyway, this one seems to fit perfectly.
- WP_20150726_012.jpg (234.37 KiB) Viewed 142376 times
-
Alcyonex

- Scoobytruck Lurker
- Posts: 9
- Joined: Sun Sep 11, 2016 9:14 am
- Location: Harrisburg, PA
- Contact:
Baja Tips and Tricks (STAY ON TOPIC!)
Baja Turbo Fog Light Always on DIY!
So this a tutorial on how to have your Turbo Baja fog lights on during parking lights mode+ and disable the high beam shut off.
First remove the lower kick panel cover beneath the steering wheel to be able to view the fuse box/body control module. To do so, remove the 2 clips on the side of the panel near the door hinges. Now Simply grab the panel and pull towards the seat to free the 3 upper clips at the top of the panel.
Once that is out of the way, In front of you is the fuse box and an array of relays below it. The second relay in from the right is the fog light relay, its a black one next to the green one. You will need to get the the wires behind it, so you will need to release the relay array from the fuse box assembly. To do so, you will need to get a small pair of needle nose pliers to release the middle front middle clip above the relay array below the fuse box. If you pull down a little on the relay array you will be able to see the middle clip, you can squeeze the outer tabs of the clip to release it, its shaped liked an anchor or arrow head. Then proceed the pry down to release the other 2 outer clips, trust me they are impossible to get to. If you break them it no big deal, the middle clip will hold it up.

Once that is down, flip it around so the wires are visible.

On the back of the relay is a red wire with a yellow stripe, cut it and connect a jumper wire to the purple wire on the fog light switch.

(Disregard all the other connectors, they were trial and error)
You will now need to remove the fog lights switch assembly. To do so, simply pry the panel out towards you to release the clips, it will pop out. Then you can see the back of the fog light switch and the wires for it.

From here you can see the purple wire on the fog light switch. Connect the red/yellow wire jumper you made to the purple wire. If you cut the purple wire to attach the jumper, you will need to reattach both ends or the purple wire together. That wire needs to stay connected together.
There is also a solid black wire that will come into play later.

At this point you will have fog lights that work in the parking light option along with all the rest. If you wish to disable the high beam shut off (which is illegal in some states) continue reading.
The next part is super easy.
Cut the yellow wire with the black stripe and connect it to the black wire. Done. No more high beam interrupt.

Remember to tape off any cut or loose connections to avoid shorts. Soldering is always the best way, I used butt splice connectors for the trial run. Soldering will be the final parts of the DIY.
Hope this helps.
Remember, this is only good for a Turbo Baja, mine is a 2006. I'm not sure the variations and differences between years and models. You will have to do your own research for that.
Re: Baja Tips and Tricks (STAY ON TOPIC!)
Just curious, did you get this from my youtube video? If so, it would be nice if you sited sources. =/ Nice write-up though. You definitely had better lighting to take some quality pictures.
https://www.youtube.com/watch?v=w6Nv5nMjAMc

Re: Baja Tips and Tricks (STAY ON TOPIC!)
Can turn it to fwd(front wheel drive) with a fuse.
The fuse box in engine compartment.
It's the shorter length of fuse rows closest to windshield.
It takes a 15 amp fuse.
The fuse box in engine compartment.
It's the shorter length of fuse rows closest to windshield.
It takes a 15 amp fuse.